by M.L. Altobelli
It’s hard to believe that it’s been four years since we built our first HK bed in the greenhouse field at the farm. The goal then was to take a huge surplus of woody debris resulting from the 2008 ice storm in western MA and combine it with other resources from the farm and make something positive out of the pieces. (You can read about our initial effort in an earlier article.)
To recap briefly, our version of an HK bed looks like this:
- bottom layer of heavy wood – usually over 4” in diameter (and up to 12”),
- then lime and fresh manure from the horse and goats worked down into the wood,
- then more wood – under 4” in diameter but not thin brush,
- then finished compost worked into that wood layer,
- next a layer of brush wood (under 1”)
- covered by 3” of loam and
- mineral mix added to the top (rock phosphate, greensand, azomite, lime and alfalfa meal blended together and then spread)
- and finally a layer of mulch with whatever you have handy – mulch hay and ground leaves are what we use.
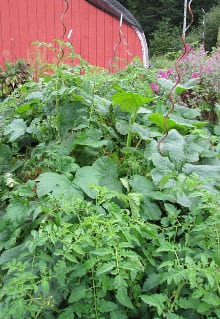
Mixed plantings in one of the HK beds.
We aim to get the bed construction (and revamping) done in the fall so the bed has the whole winter (six months usually) to cook and mellow out. Our “recipe” calls for many different components that don’t immediately relate well to each other. The winter provides the breathing space necessary to allow for some integration of materials and less damage to the roots of the veggies, etc. that will be planted the following year.
The Successes
We were successful! The beds have turned out to be stable physically, active biologically, and productive. They are reasonably drought and flood resistant – a useful development with the flood/drought rain cycles we’re seeing. We’ve never had so much rain that the HK beds couldn’t absorb everything that hit them and not collapse, and we’ve been able to go six weeks without watering as the summer intensifies.
There is a caveat to that drought tolerance though. The plants do start to demonstrate stress issues at about the six week point, so if ongoing vegetable or cut flower production is your aim then you should step in with irrigation at about the four week point. Perennial and woody plants aren’t as sensitive and can handle the drying conditions.
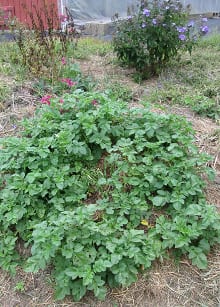
The greenhouse HK bed contains perennialized potatoes.
Experimenting and Tweaking
Our HK beds have been planted in an experimental fashion to see what would work best and those decisions continue. It turns out that squashes and potatoes do extremely well with onions coming in next. Tomatoes are good in the HK bed nearest the greenhouse where we can get more water on them but not as good in the farther beds – especially if planted beyond the squash. Getting water to them easily at that point doesn’t happen.
It’s been interesting watching the evolution of the beds. HK1, the first bed we did in 2009, needed refurbishing two years ago (2012) and will need another refurbishing next year. This seems to mean a “sprucing up” every 2-3 years depending on conditions noticed on the HK. To refurbish, we added in more wood of smaller diameter (about 1-inch), padded that with compost, and topped with loam and minerals again (steps 6 and 7 in our original construction). That worked really well, and we used that knowledge to touch up other areas as they become either too settled (with the larger base wood showing through) or too hollow (where the existing wood has rotted out altogether).
We also learned the hard way that building an HK bed fast doesn’t work. There is a certain level of specificity to the building that is hard to fix if missed at the beginning. It’s kind of like coming into a damaged landscape and trying to get it healthy by only working on the surface – it can be done but not efficiently! HK 3 was built in a hurry ahead of a major snowstorm, and it hasn’t settled right and doesn’t grow right. We tweaked it last year – 2014 – by adding another layer of “brown” mulch (a mix of mulch hay and duck bedding)– and this year we’re going to cover it with fresh manure (from the goats) and stone dust (from a local quarry) and tarp it with landscape fabric for a year and let the whole thing cook itself out. We’ve been a lot more careful since!! We might try planting it mid season with a later crop series but probably won’t get to that due to other landscape job pressure.
Supporting Annuals
When we plant the annual crops, we use the high mineral planting mix (see recipe at end of article) that we’ve refined over the last few years for the flowerscaping business, adjusting the amount per plant to the kind of plant – tomatoes are much heavier feeders than onions. Most of the flowering annuals need two good handfuls per plant worked into the top four to six inches of soil (zinnias, marigolds, lisianthus, etc.). Even lower feeding plants like begonia do very well on about a handful per plant. Tomatoes and squashes get four to five handfuls per plant worked into about a foot depth and onions get a fat sprinkle in the row before planting.
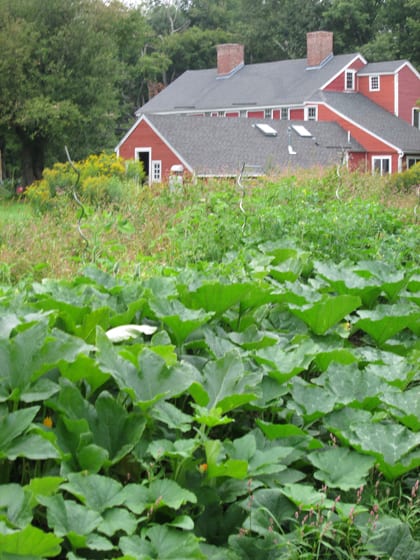
Squashes in HK 2 grew heavily and produced a lot of squash.
The goal of this early mineralizing fertilizer is to help the plants develop a well branched and expanding root system with an active rhizosphere with all of its attendant microbes. This rhizosphere is essentially the external “guts” or digestive tract for the plant (just like the microbes in your own guts), and they have to be active and healthy for the plant to be sturdy and capable of resisting insects and diseases as well as environmental stressors. If in doubt about the quality of soil, use a microbe inoculant on the transplants just before setting them into the ground. I usually drench the plants with inoculant, liquid humates, kelp, and molasses the morning that they’re due to be planted. This includes everything – purchased plants as well as home-grown starts. It does make for an early start to the day since the mixture doesn’t store; it’s a biologically active mix and will kill itself off if left for more than a couple of hours.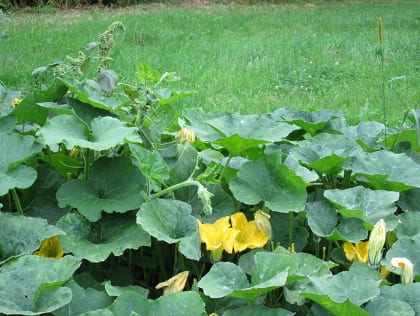
This early fertilization lasts very well though July and will provide adequate results all the way through September, but it won’t provide top quality that both clients and we need. And I can tell you the classic tale of the shoemaker’s children going without shoes applies here for sure. I always get the next step done for the clients’ gardens, but sometimes have real trouble finding the time and energy to get it done on the home gardens. I usually end up picking our favorite veggies to concentrate on and regretting the rest – a typical landscaper’s life!
Feeding for Late Summer
From many years of past experiences, mid-July is the witching point in the garden year, and this is the critical time to step in. June is an excitable month and can often be either too wet or too dry and that leaves stresses in the plant and its ecosystem. July finishes the scaffolding production phase and starts the fruiting and filling stage of both flowers and fruits, so any residual stresses from June can get magnified before you know it. This is when liquid fertilizers and foliar sprays can be used to great effect. About this time, I start using a mix of liquid fish, kelp, yucca, and molasses on the more demanding plants (or the plants that need to look great through October). It works out to be about a tablespoon of each ingredient per gallon of water, but I mix up just the ingredients in either a 32 or 50 gallon trash barrel and then use a sump pump to water it in. You can also use a conventional “blue” fertilizer (like Miracle Gro – heresy to be sure!), in this mix instead of the fish if the soil temps are too cool (below 45˚) or if you’re working with containers. Containers need more intense management if they’re going to look good and perform long into the fall (think mid-October) with no thinning or weakness except from frost.
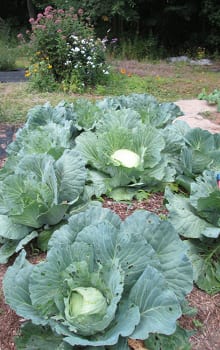
Cabbage did very well in the HK beds and did not need the extra attention required by the flowering plants.
This past year we had excellent results in the HK beds until the third week the August when the weather changed dramatically and we had exactly the right conditions for late blight to hit – and hit it did. We had been pushing our tomatoes for heavy production but not supporting them as we should (that whole shoemaker thing), and they tanked with a huge drop in energy going out to the fruit and not enough to support the plant itself. I used the liquid fertilizer approach and managed to hold onto some of the production but not all of it. Next year we’re going to balance out the production better with the support. On the other hand, the cabbages grew to about 10 lbs – no late blight there. It also points up one of the keys to good growing – it’s the flowering/fruiting plants that need the most support.
The Recipe for High Mineral Planting Mix
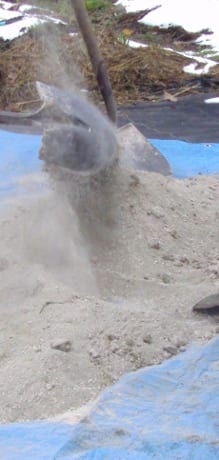
We mix soil components on large tarps.
The basic planting mix we use for mineralized garden production is hand mixed on a tarp and then stored in water tight containers for future use. Use a dust mask if the wind isn’t working to your advantage. The mix will hold indefinitely if kept dry, but BEWARE if it gets wet and starts to cook!
Standard mix:
- 2 – 50lb bags of alfalfa meal
- 2 – 50lb bags of North Country Organics Pro-gro
- 1 – 40lb bag of Azomite,
- 1 – 40lb bag of Soil Activator (leonardite) and
- 1 – 50lb bag of calcite (We sometimes use gypsum or carbonatite depending on planned work.)
This mix is worked into every planting hole with amounts adjusted to match the needs of the plants – heavy feeders get much more than a wild flower (a dusting) does. Heavy or long season feeders may need an extra amount worked in around the middle of July in order to ensure extended production of either fruit or flowers. Tomatoes, zucchini, and summer squash can produce well into the fall and zinnias and marigolds can look spectacular in late September and early October – better than a lot of mums if handled well. Most will even handle a light frost and push through new flowers or finish ripening fruit if the weather cooperates.
About the Author
M.L. Altobelli has been creating and maintaining fine gardens for over 20 years and brings a strong commitment to creating sustainable soils for healthy people, flower, trees and grass to all of her sites. With a B.S. in Animal Science, M.L. has read widely about plants and soil, and she experiments to find ecological and organic solutions that suit the individual site. A founding member of ELA, M.L. currently serves on the Board of Directors. Her work at Woody End Farm was recently written up in the Sentinel and Enterprise. M.L. may be reached at altobelliml260@comcast.net.